You can create a draft configuration for a cluster and edit the host settings in the vSphere Client.
Prerequisites
- Verify that vCenter Server is of version 8.0 Update 2 or later and ESXi is of version 8.0 Update 1 or later for using vSphere Configuration Profiles on a cluster that you manage with a single image.
- Verify that vCenter Server and ESXi are of version 8.0 Update 3 or later for using vSphere Configuration Profiles on a cluster that you manage with baselines.
- Verify that you have the required license.
- Verify that you have a draft configuration created for the cluster.
- Verify that you have the required privileges for performing remediation. See Required Privileges for Using vSphere Configuration Profiles.
Procedure
- In the vSphere Client, navigate to a cluster that you manage with a single image or to a cluster that you manage with baselines.
- On the Configure tab, click .
- On the Draft tab, navigate to the host setting that you want to edit.
- Edit the host setting of the draft configuration.
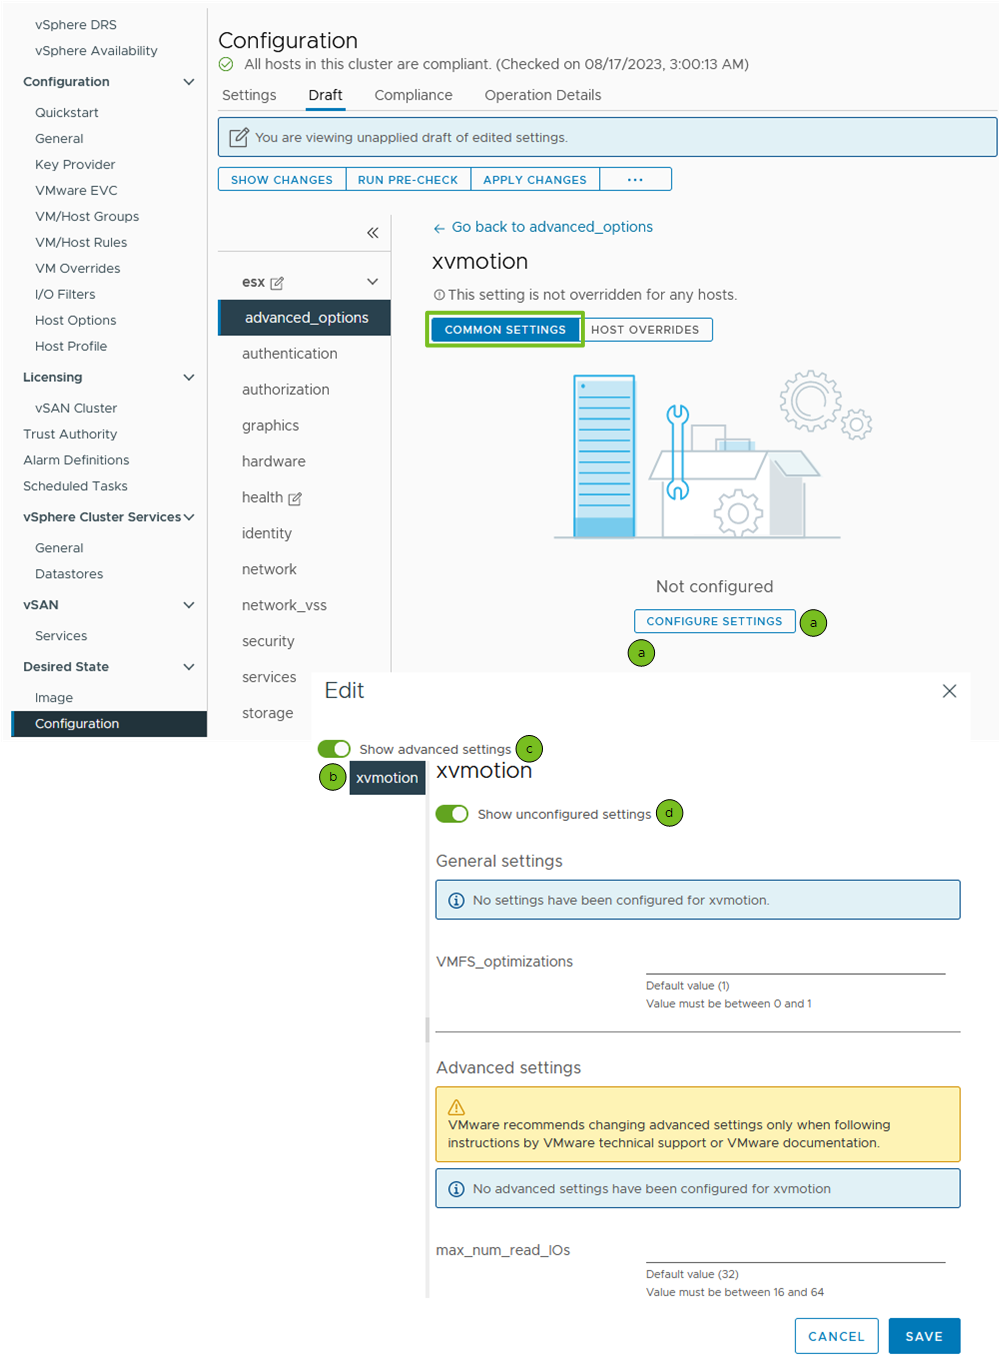
Option Steps Configure a common setting that has no existing configuration - On the Common settings tab, click Configure settings.
The Edit dialog box appears.
Figure 1. Configure a common setting 
- Select the common setting from the left sidebar and configure its value.
The settings of the selected item appear on the right of the Edit dialog box.
- (Optional) Activate the Show advanced settings toggle, to view and edit the advanced settings.
If there is at least one advanced setting configured, the Show advanced settings toggle is automatically activated.
- (Optional) Deactivate the Show unconfigured settings toggle, to view and edit only the configured settings. By default, the toggle is activated.
- Click Save.
The configured settings appear under the Common settings tab.
Edit a common setting that is already configured - On the Common settings tab, navigate to the current configuration for the selected setting and select it from the tree on the left.
- Click Edit.
The Edit dialog box appears.
- Navigate to the configured setting by clicking on the View settings links and edit the value of the setting.
- Click Save.
Delete a common setting configuration - On the Common settings tab, select the setting you want to delete from the list of configured settings and click Delete.
- Click Delete setting to confirm the deletion of the setting configuration.
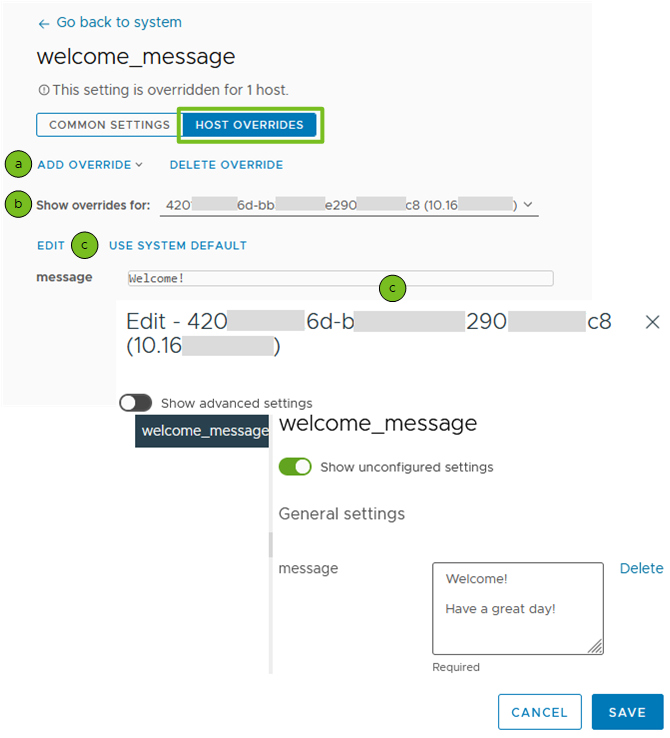
Add a host override for a configured common setting - On the Host overrides tab, click the Add override drop-down menu and select an option.
- To add a host override by filtering the available hosts in the cluster using their host names, click Add override by host name.
The Add override for <setting_name> dialog box appears.
Select a host and click Add override. - To add a host override by filtering the hosts using their BIOS UUID, click Add override by BIOS UUID.
The Add override for <setting_name> dialog box appears.
Enter the BIOS UUID of the host in the respective field and click Add override.You can use this option to add a host override for a host that is not currently part of the cluster.
- To add a host override by filtering the available hosts in the cluster using their host names, click Add override by host name.
- From the Show overrides for drop-down menu, select the host override that you created.
The configured common setting with its value appear under the drop-down menu.
- Select from the options for editing.
- To edit the current configuration of the common setting, click Edit.
The Edit - <BIOS UUID (<host_name>)> dialog box appears.
Figure 2. Edit a host override for a configured common setting 
Navigate to the configured setting and change its value.
- To apply the system default configuration which can be different from the common configuration of the setting, click Use system default and confirm your choice.
- To edit the current configuration of the common setting, click Edit.
- On the Common settings tab, click Configure settings.