Deploy Management Clusters with the Installer Interface
This topic describes how to use the Tanzu Kubernetes Grid installer interface to deploy a management cluster to vSphere when the vSphere with Tanzu Supervisor is not enabled, to Amazon Web Services (AWS), and to Microsoft Azure. The Tanzu Kubernetes Grid installer interface guides you through the deployment of the management cluster and provides different configurations for you to select or reconfigure. If this is the first time that you are deploying a management cluster to a given target platform, it is recommended to use the installer interface, except in cases where noted that you must deploy from a configuration file.
ImportantTanzu Kubernetes Grid v2.4.x is the last version of TKG that supports the creation of standalone TKG management clusters on AWS and Azure. The ability to create standalone TKG management clusters on AWS and Azure will be removed in the Tanzu Kubernetes Grid v2.5 release.
Starting from now, VMware recommends that you use Tanzu Mission Control to create native AWS EKS and Azure AKS clusters instead of creating new standalone TKG management clusters or new TKG workload clusters on AWS and Azure. For information about how to create native AWS EKS and Azure AKS clusters with Tanzu Mission Control, see Managing the Lifecycle of AWS EKS Clusters and Managing the Lifecycle of Azure AKS Clusters in the Tanzu Mission Control documentation.
For more information, see Deprecation of TKG Management and Workload Clusters on AWS and Azure in the VMware Tanzu Kubernetes Grid v2.4 Release Notes.
Prerequisites
Before you can deploy a management cluster, you must make sure that your environment meets the requirements for the target platform.
General Prerequisites
- Make sure that you have met all of the requirements and followed all of the procedures in Install the Tanzu CLI and Kubernetes CLI for Use with Standalone Management Clusters.
-
For production deployments, it is strongly recommended to enable identity management for your clusters. For information about the preparatory steps to perform before you deploy a management cluster, see Obtain Your Identity Provider Details in Configure Identity Management.
-
If you are deploying clusters in an internet-restricted environment to either vSphere or AWS, you must also perform the steps in Prepare an Internet-Restricted Environment. These steps include setting
TKG_CUSTOM_IMAGE_REPOSITORYas an environment variable.
Infrastructure Prerequisites
Each target platform has additional prerequisites for management cluster deployment.
- vSphere
-
Make sure that you have met the all of the requirements listed in
Prepare to Deploy Management Clusters to vSphere.
Note
On vSphere with Tanzu in vSphere 8, you do not need to deploy a management cluster. See vSphere with Tanzu Supervisor is a Management Cluster. For TKG deployments to vSphere, VMware recommends that you use the vSphere with Tanzu Supervisor. Using TKG with a standalone management cluster is only recommended for the use cases listed in When to Use a Standalone Management Cluster in About TKG.
- AWS
-
- Make sure that you have met the all of the requirements listed Prepare to Deploy Management Clusters to AWS.
- For information about the configurations of the different sizes of node instances, for example
t3.large, ort3.xlarge, see Amazon EC2 Instance Types. - For information about VPC and NAT resources that Tanzu Kubernetes Grid uses, see Resource Usage in Your Amazon Web Services Account.
- Azure
-
- Make sure that you have met the requirements listed in Prepare to Deploy Management Clusters to Microsoft Azure.
- For information about the configurations of the different sizes of node instances for Azure, for example,
Standard_D2s_v3orStandard_D4s_v3, see Sizes for virtual machines in Azure.
Start the Installer Interface
By default Tanzu Kubernetes Grid saves the kubeconfig for all management clusters in the ~/.kube-tkg/config file. If you want to save the kubeconfig file for your management cluster to a different location, set the KUBECONFIG environment variable before running tanzu mc create.
-
On the machine on which you downloaded and installed the Tanzu CLI, run the
tanzu mc createcommand with the--uioption:tanzu management-cluster create --uiIf the prerequisites are met, the installer interface launches in a browser and takes you through steps to configure the management cluster.
Caution
The
tanzu mc createcommand takes time to complete. Whiletanzu mc createis running, do not run additional invocations oftanzu mc createon the same bootstrap machine to deploy multiple management clusters, change context, or edit~/.kube-tkg/config.The Installer Interface Options section below explains how you can change where the installer interface runs, including running it on a different machine from the Tanzu CLI.
-
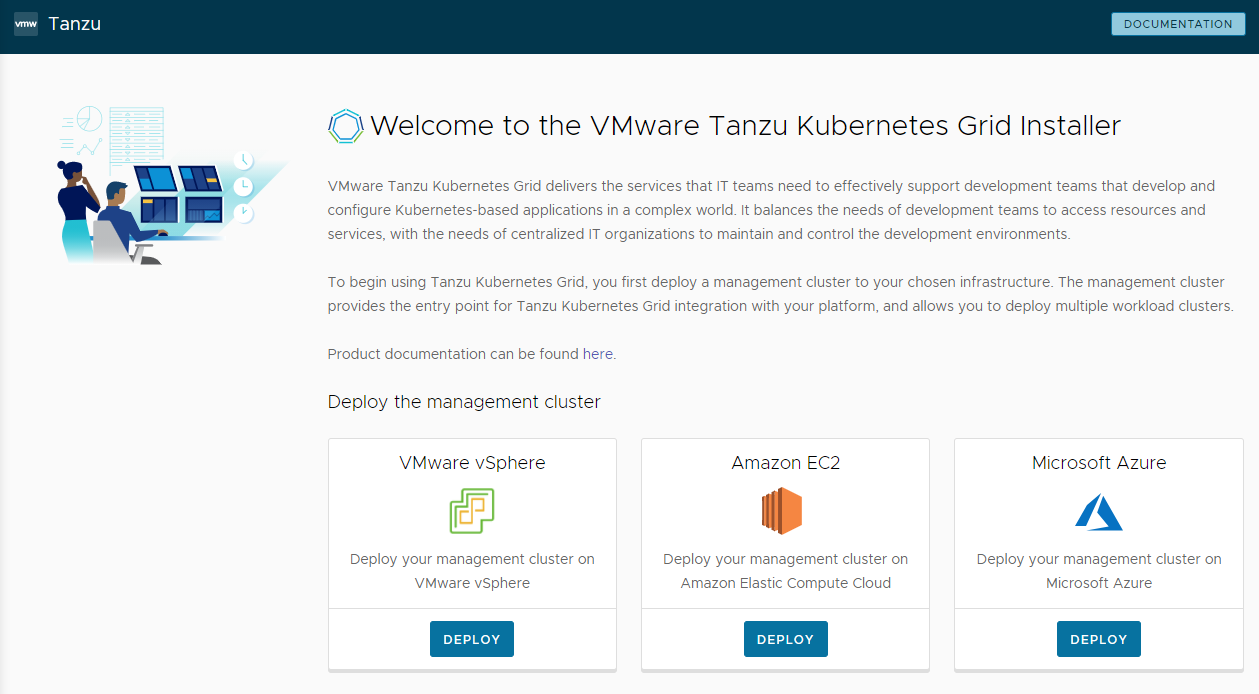
Click the Deploy button for VMware vSphere, Amazon EC2, or Microsoft Azure.
Installer Interface Options
By default, tanzu mc create --ui opens the installer interface locally, at http://127.0.0.1:8080 in your default browser. You can use the --browser and --bind options to control where the installer interface runs:
--browserspecifies the local browser to open the interface in.- Supported values are
chrome,firefox,safari,ie,edge, ornone. - Use
nonewith--bindto run the interface on a different machine, as described below.
- Supported values are
-
--bindspecifies the IP address and port to serve the interface from.Caution
Serving the installer interface from a non-default IP address and port could expose the Tanzu CLI to a potential security risk while the interface is running. VMware recommends passing in to the
–bindoption an IP and port on a secure network.
Use cases for --browser and --bind include:
- If another process is already using
http://127.0.0.1:8080, use--bindto serve the interface from a different local port. - To make the installer interface appear locally if you are SSH-tunneling in to the bootstrap machine or X11-forwarding its display, you may need to use
--browser none. -
To run the Tanzu CLI and create management clusters on a remote machine, and run the installer interface locally or elsewhere:
-
On the remote bootstrap machine, run
tanzu mc create --uiwith the following options and values:--bind: an IP address and port for the remote machine--browser:none
tanzu mc create --ui --bind 192.168.1.87:5555 --browser none -
On the local UI machine, browse to the remote machine’s IP address to access the installer interface.
-
Configure the Target Platform
The options to configure the target platform depend on which provider you are using.
- vSphere
-
Configure the connection to your vSphere instance.
-
In the IaaS Provider section, enter the IP address or fully qualified domain name (FQDN) for the vCenter Server instance on which to deploy the management cluster.
Support for IPv6 addresses in Tanzu Kubernetes Grid is limited; see Deploy Clusters on IPv6 (vSphere Only). If you are not deploying to an IPv6-only networking environment, you must provide IPv4 addresses in the following steps.
-
Enter the vCenter Single Sign-On username and password for a user account that has the required privileges for Tanzu Kubernetes Grid operation.
The account name must include the domain, for example
administrator@vsphere.local.
-
(Optional) Under SSL Thumbprint Verification, select Disable Verification. If you select this checkbox, the installer bypasses certificate thumbprint verification when connecting to the vCenter Server.
-
Click Connect.
-
Verify the SSL thumbprint of the vCenter Server certificate and click Continue if it is valid. This screen appears only if the Disable Verification checkbox above is deselected.
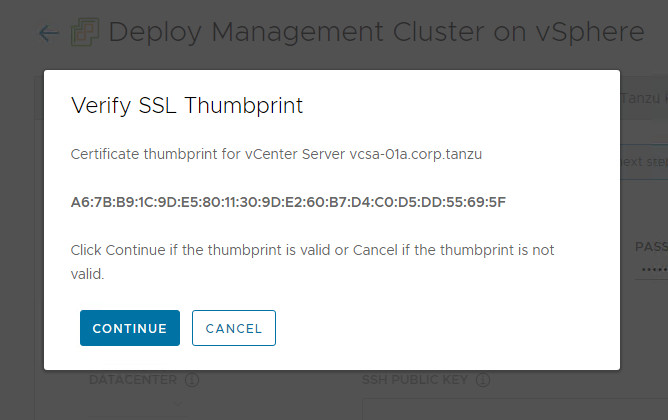
For information about how to obtain the vCenter Server certificate thumbprint, see Obtain vSphere Certificate Thumbprints.
-
If you are deploying a management cluster to a vSphere 7 or vSphere 8 instance, confirm whether or not you want to proceed with the deployment.
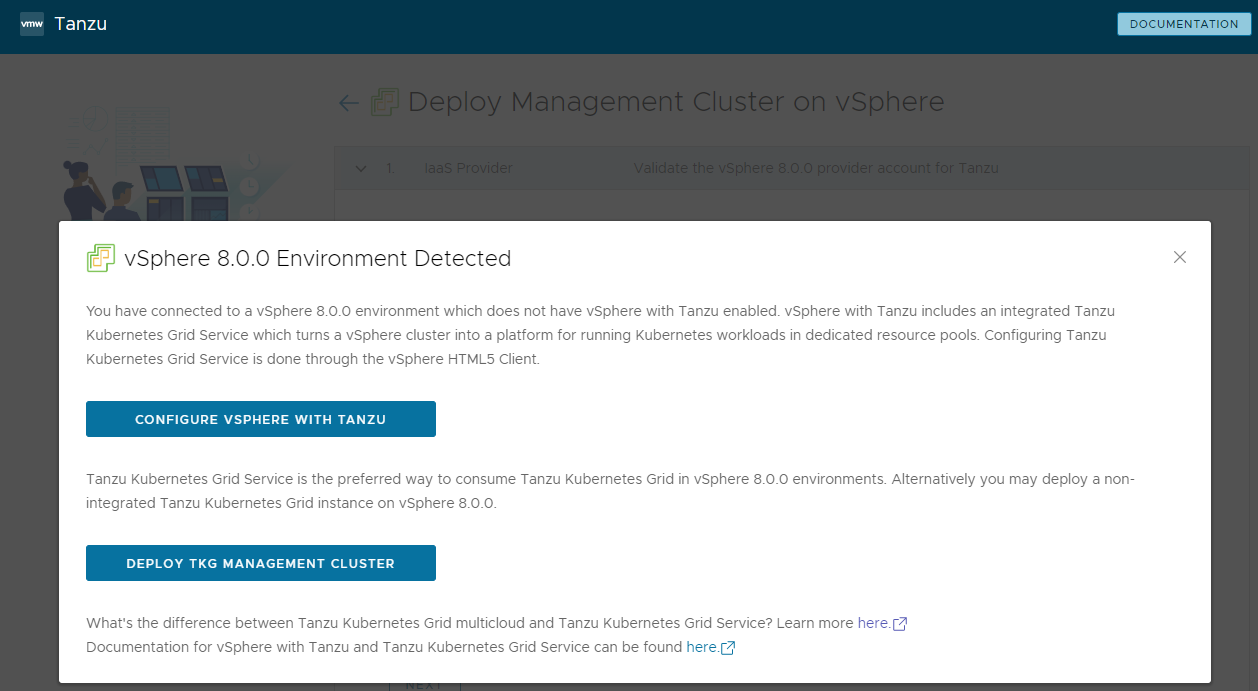
On vSphere 7 and vSphere 8, vSphere with Tanzu provides a built-in Supervisor that serves as a management cluster and provides a better experience than a standalone management cluster. Deploying a Tanzu Kubernetes Grid management cluster to vSphere 7 or vSphere 8 when the Supervisor is not present is supported, but the preferred option is to enable vSphere with Tanzu and use the Supervisor if possible. Azure VMware Solution does not support a Supervisor Cluster, so you need to deploy a management cluster.
For information, see vSphere with Tanzu Supervisor is a Management Cluster in Creating and Managing TKG 2.4 Workload Clusters with the Tanzu CLI .
If vSphere with Tanzu is enabled, the installer interface states that you can use the TKG Service as the preferred way to run Kubernetes workloads, in which case you do not need a standalone management cluster. It presents a choice:
-
Configure vSphere with Tanzu opens the vSphere Client so you can configure your Supervisor as described in Configuring and Managing a Supervisor in the vSphere 8 documentation.
-
Deploy TKG Management Cluster allows you to continue deploying a standalone management cluster, for vSphere 7 or vSphere 8, and as required for and Azure VMware Solution.
-
-
Select the datacenter in which to deploy the management cluster from the Datacenter drop-down menu.
-
Add your SSH public key. To add your SSH public key, use the Browse File option or manually paste the contents of the key into the text box. Click Next.

-
- AWS
-
Configure the connection to your AWS account.
-
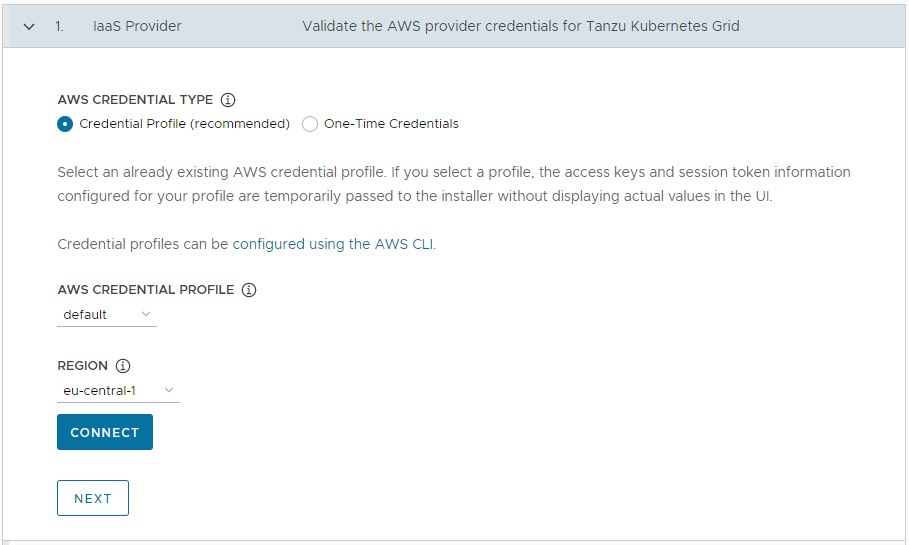
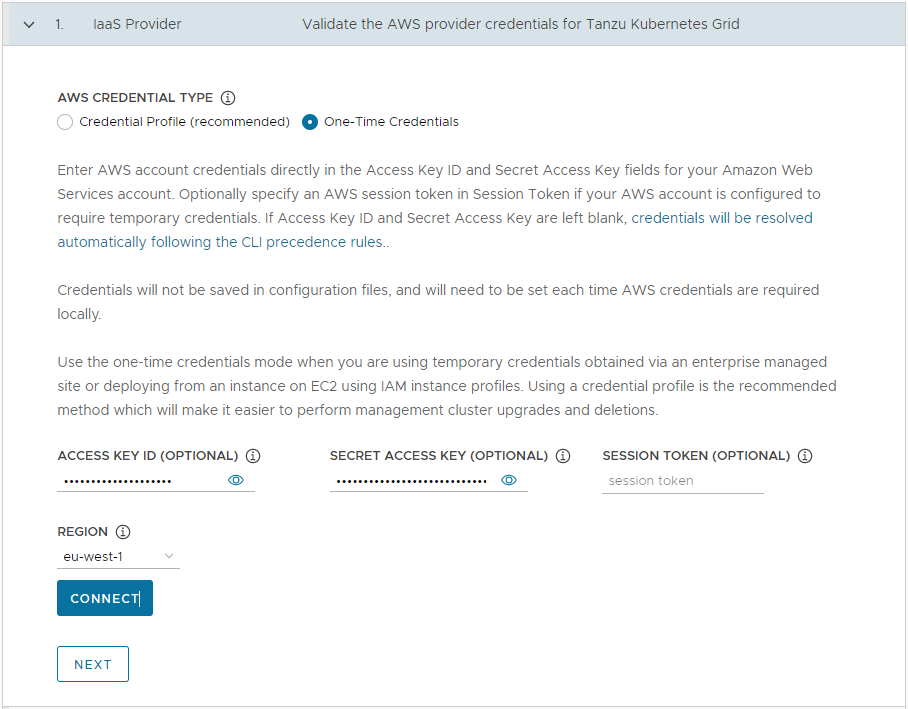
In the IaaS Provider section, select how to provide the credentials for your AWS account. You have two options:
-
Credential Profile (recommended): Select an already existing AWS credential profile. If you select a profile, the access key and session token information configured for your profile are passed to the Installer without displaying actual values in the UI. For information about setting up credential profiles, see Credential Files and Profiles.
-
One-Time Credentials: Enter AWS account credentials directly in the Access Key ID and Secret Access Key fields for your AWS account. Optionally specify an AWS session token in Session Token if your AWS account is configured to require temporary credentials. For more information on acquiring session tokens, see Using temporary credentials with AWS resources.
-
-
In Region, select the AWS region in which to deploy the management cluster.
If you intend to deploy a production management cluster, this region must have at least three availability zones.
- Click Connect. If the connection is successful, click Next.
-
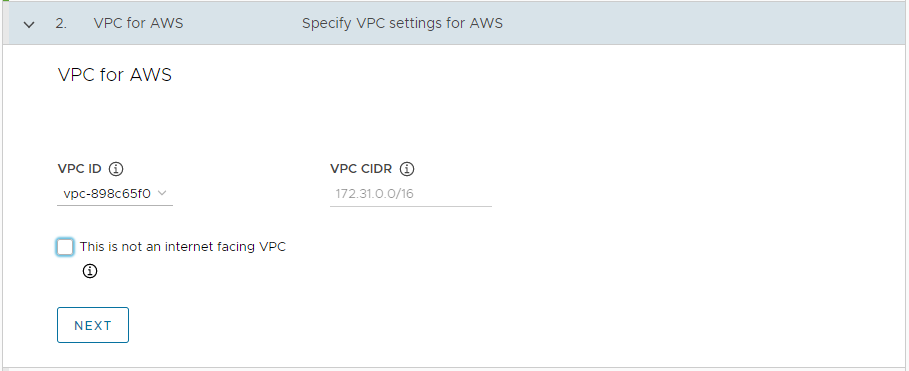
In the VPC for AWS section, select the VPC ID from the drop-down menu. The VPC CIDR block is filled in automatically when you select the VPC. If you are deploying the management cluster in an internet-restricted environment, such as a proxied or air-gapped environment, select the This is not an internet facing VPC check box.
-
- Azure
-
Configure the connection to your Microsoft Azure account.
Important
If this is the first time that you are deploying a management cluster to Azure with a new version of Tanzu Kubernetes Grid, for example v2.4, make sure that you have accepted the base image license for that version. For information, see Accept the Base Image License in Prepare to Deploy Management Clusters to Microsoft Azure.
-
In the IaaS Provider section, enter the Tenant ID, Client ID, Client Secret, and Subscription ID values for your Azure account. You recorded these values when you registered an Azure app and created a secret for it using the Azure Portal.

- Select your Azure Environment, either Public Cloud or US Government Cloud. You can specify other environments by deploying from a configuration file and setting
AZURE_ENVIRONMENT. - Click Connect. The installer verifies the connection and changes the button label to Connected.
- Select the Azure region in which to deploy the management cluster.
-
Paste the contents of your SSH public key, such as
.ssh/id_rsa.pub, into the text box. -
Under Resource Group, select either the Select an existing resource group or the Create a new resource group radio button.
-
If you select Select an existing resource group, use the drop-down menu to select the group, then click Next.

-
If you select Create a new resource group, enter a name for the new resource group and then click Next.

-
-
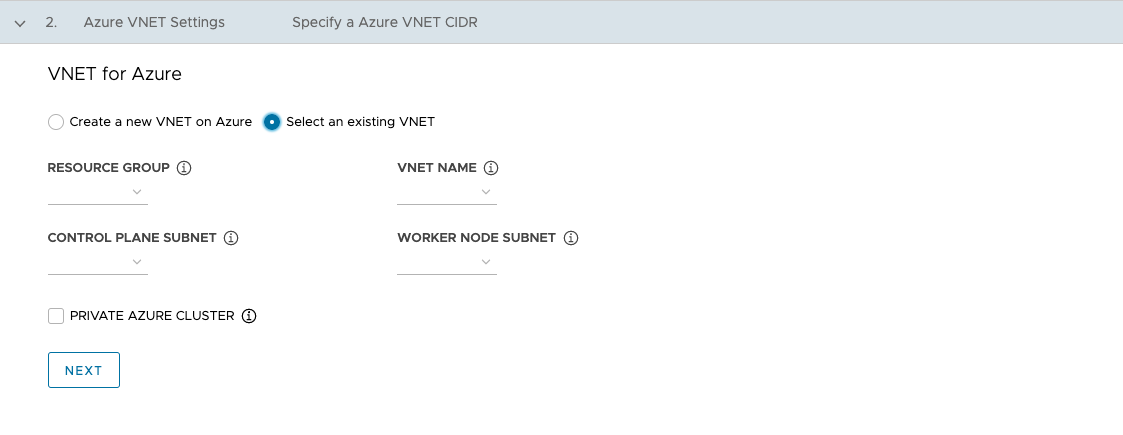
In the VNet for Azure section, select either the Create a new VNet on Azure or the Select an existing VNet radio button.
-
If you select Create a new VNet on Azure, use the drop-down menu to select the resource group in which to create the VNet and provide the following:
- A name and a CIDR block for the VNet. The default is
10.0.0.0/16. - A name and a CIDR block for the control plane subnet. The default is
10.0.0.0/24. - A name and a CIDR block for the worker node subnet. The default is
10.0.1.0/24.
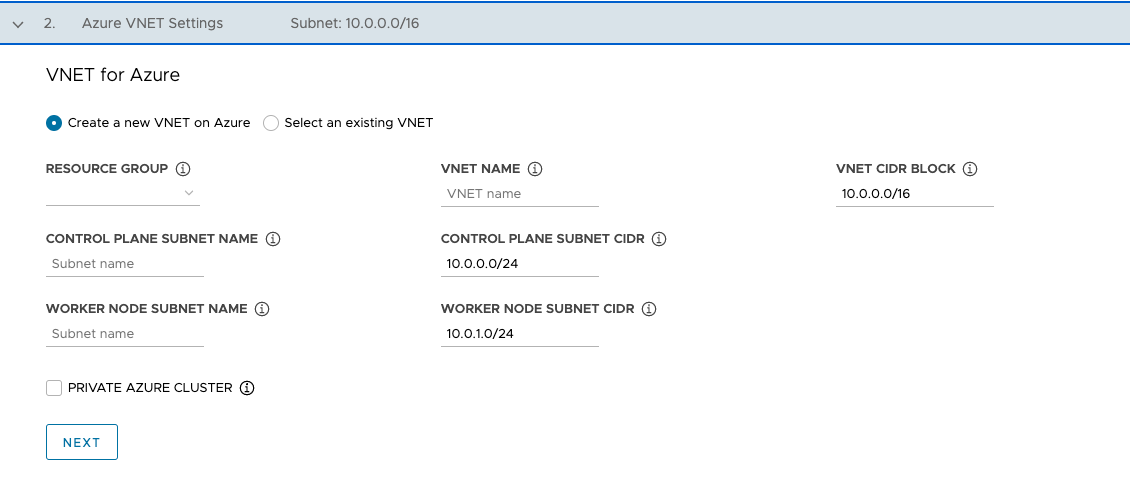
After configuring these fields, click Next.
- A name and a CIDR block for the VNet. The default is
-
If you select Select an existing VNet, use the drop-down menus to select the resource group in which the VNet is located, the VNet name, the control plane and worker node subnets, and then click Next.
-
To make the management cluster private, as described in Azure Private Clusters, enable the Private Azure Cluster checkbox.
-
-
Configure the Management Cluster Settings
Some of the options to configure the management cluster depend on which provider you are using.
-
In the Management Cluster Settings section, select the Development or Production tile.
- If you select Development, the installer deploys a management cluster with a single control plane node and a single worker node.
- If you select Production, the installer deploys a highly available management cluster with three control plane nodes and three worker nodes.
-
In either of the Development or Production tiles, use the Instance type drop-down menu to select from different combinations of CPU, RAM, and storage for the control plane node VM or VMs.
Choose the configuration for the control plane node VMs depending on the expected workloads that it will run. For example, some workloads might require a large compute capacity but relatively little storage, while others might require a large amount of storage and less compute capacity. If you select an instance type in the Production tile, the instance type that you selected is automatically selected for the Worker Node Instance Type. If necessary, you can change this.
If you plan on registering the management cluster with Tanzu Mission Control, ensure that your workload clusters meet the requirements listed in Requirements for Registering a Tanzu Kubernetes Cluster with Tanzu Mission Control in the Tanzu Mission Control documentation.
- vSphere
- Select a size from the predefined CPU, memory, and storage configurations. The minimum configuration is 2 CPUs and 4 GB memory.
- AWS
- Select an instance size. The drop-down menu lists choices alphabetically, not by size. The minimum configuration is 2 CPUs and 8 GB memory. The list of compatible instance types varies in different regions. For information about the configuration of the different sizes of instances, see Amazon EC2 Instance Types.
- Azure
- Select an instance size. The minimum configuration is 2 CPUs and 8 GB memory. The list of compatible instance types varies in different regions. For information about the configurations of the different sizes of node instances for Azure, see Sizes for virtual machines in Azure.

-
Optionally enter a name for your management cluster.
If you do not specify a name, Tanzu Kubernetes Grid automatically generates a unique name. If you do specify a name, that name must end with a letter, not a numeric character, and must be compliant with DNS hostname requirements as outlined in RFC 952 and amended in RFC 1123.
-
(Optional) Select the Machine Health Checks checkbox if you want to activate
MachineHealthCheck. You can activate or deactivateMachineHealthCheckon clusters after deployment by using the CLI. For instructions, see Configure Machine Health Checks for Workload Clusters. -
(Optional) Select the Enable Audit Logging checkbox to record requests made to the Kubernetes API server. For more information, see Audit Logging.
-
Configure additional settings that are specific to your target platform.
- vSphere
-
Configure settings specific to vSphere.
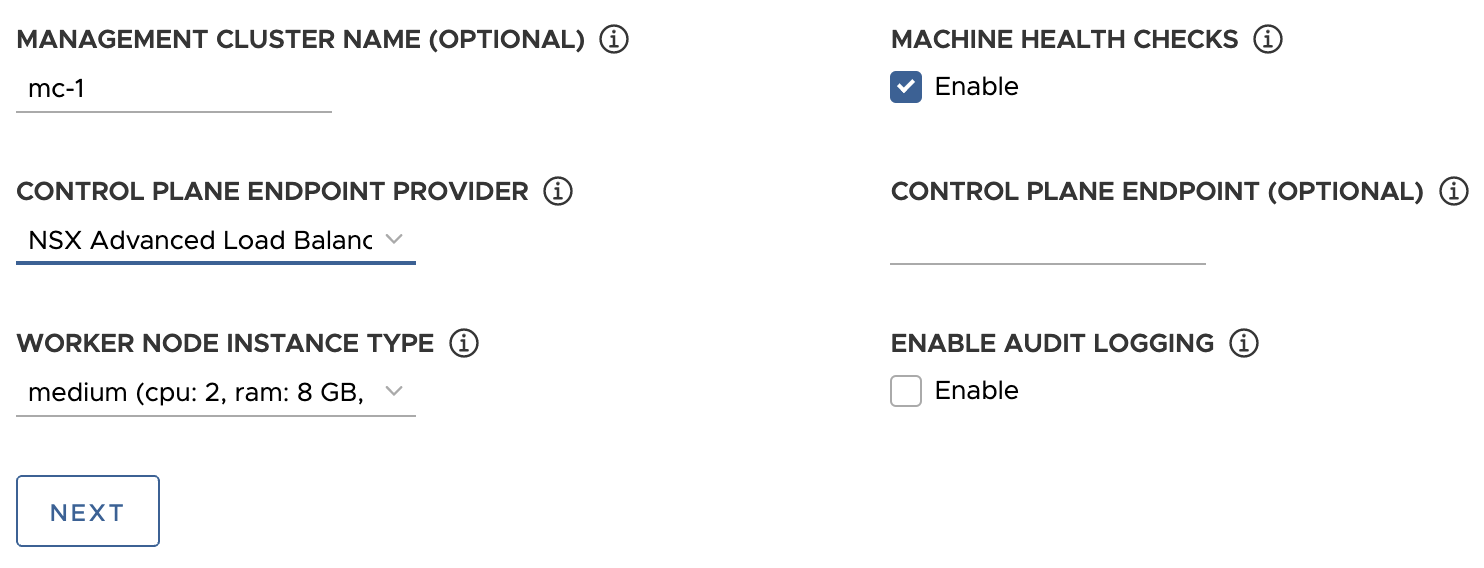
- Under Worker Node Instance Type, select the configuration for the worker node VM.
-
Under Control Plane Endpoint Provider, select Kube-Vip or NSX Advanced Load Balancer to choose the component to use for the control plane API server.
To use NSX Advanced Load Balancer, you must first deploy it in your vSphere environment. For information, see Install NSX Advanced Load Balancer. For more information on the advantages of using NSX Advanced Load Balancer as the control plane endpoint provider, see Configure NSX Advanced Load Balancer.
-
Under Control Plane Endpoint, enter a static virtual IP address or FQDN for API requests to the management cluster. This setting is required if you are using Kube-Vip.
Ensure that this IP address is not in your DHCP range, but is in the same subnet as the DHCP range. If you mapped an FQDN to the VIP address, you can specify the FQDN instead of the VIP address. For more information, see Static VIPs and Load Balancers for vSphere.
If you are using NSX Advanced Load Balancer as the control plane endpoint provider, the VIP is automatically assigned from the NSX Advanced Load Balancer static IP pool.
- AWS
-
Configure settings specific to AWS.
-
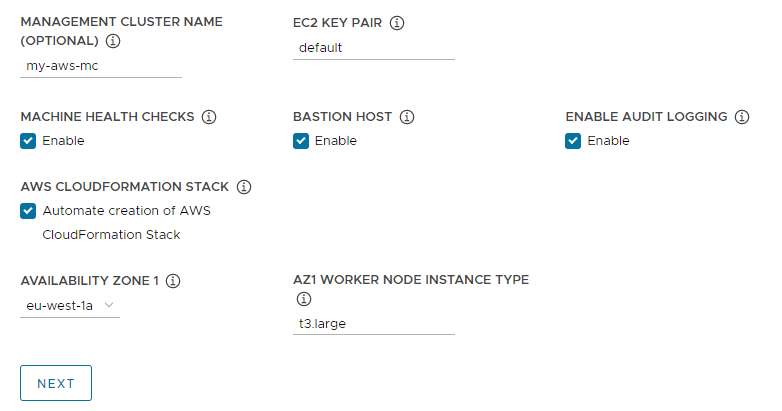
In EC2 Key Pair, specify the name of an AWS key pair that is already registered with your AWS account and in the region where you are deploying the management cluster. You may have set this up in Configure AWS Account Credentials and SSH Key.
-
(Optional) Deactivate the Bastion Host checkbox if a bastion host already exists in the availability zone(s) in which you are deploying the management cluster.
If you leave this option enabled, Tanzu Kubernetes Grid creates a bastion host for you.
-
If this is the first time that you are deploying a management cluster to this AWS account, select the Automate creation of AWS CloudFormation Stack checkbox.
This CloudFormation stack creates the identity and access management (IAM) resources that Tanzu Kubernetes Grid needs to deploy and run clusters on AWS. For more information, see Permissions Set by Tanzu Kubernetes Grid in Prepare to Deploy Management Clusters to AWS.
-
Configure Availability Zones:
-
From the Availability Zone 1 drop-down menu, select an availability zone for the management cluster. You can select only one availability zone if you selected the Development tile. See the image below.
-
From the AZ1 Worker Node Instance Type drop-down menu, select the configuration for the worker node VM from the list of instances that are available in this availability zone.
-
If you selected the Production tile above, use the Availability Zone 2, Availability Zone 3, and AZ Worker Node Instance Type drop-down menus to select three unique availability zones for the management cluster.
When Tanzu Kubernetes Grid deploys the management cluster, which includes three control plane nodes and three worker nodes, it distributes the control plane nodes and worker nodes across these availability zones.
-
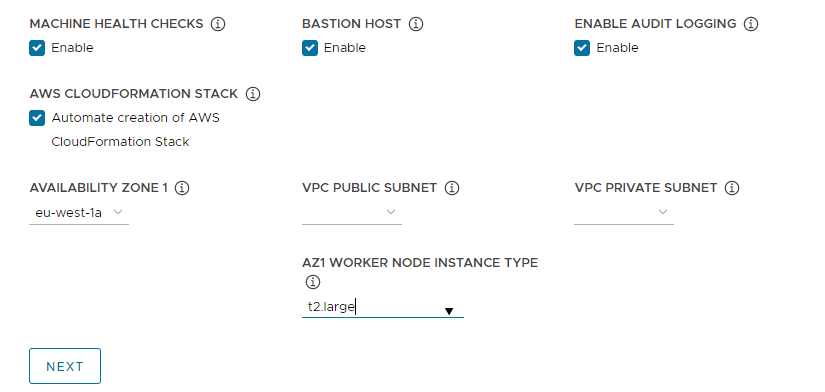
Use the VPC public subnet and VPC private subnet drop-down menus to select subnets on the VPC.
If you are deploying a production management cluster, select subnets for all three availability zones. Public subnets are not available if you selected This is not an internet facing VPC in the previous section. The following image shows the Development tile.
-
-
- Azure
- Under Worker Node Instance Type, select the configuration for the worker node VM.
-
Click Next.
Configure VMware NSX Advanced Load Balancer
Configuring NSX Advanced Load Balancer only applies to vSphere deployments.
- vSphere
-
VMware NSX Advanced Load Balancer (ALB) provides an L4+L7 load balancing solution for vSphere. NSX ALB includes a Kubernetes operator that integrates with the Kubernetes API to manage the lifecycle of load balancing and ingress resources for workloads. To use NSX ALB, you must first deploy it in your vSphere environment. For information, see
Install NSX Advanced Load Balancer.
Important
On vSphere 8, to use NSX Advanced Load Balancer with a TKG standalone management cluster and its workload clusters you need NSX ALB v22.1.2 or later and TKG v2.1.1 or later.
In the optional VMware NSX Advanced Load Balancer section, you can configure Tanzu Kubernetes Grid to use NSX Advanced Load Balancer. By default all workload clusters will use the load balancer.
- For Controller Host, enter the IP address or FQDN of the Controller VM.
- Enter the username and password that you set for the Controller host when you deployed it.
-
Paste the contents of the Certificate Authority that is used to generate your controller certificate into the Controller Certificate Authority text box and click Verify Credentials.
The certificate contents begin with
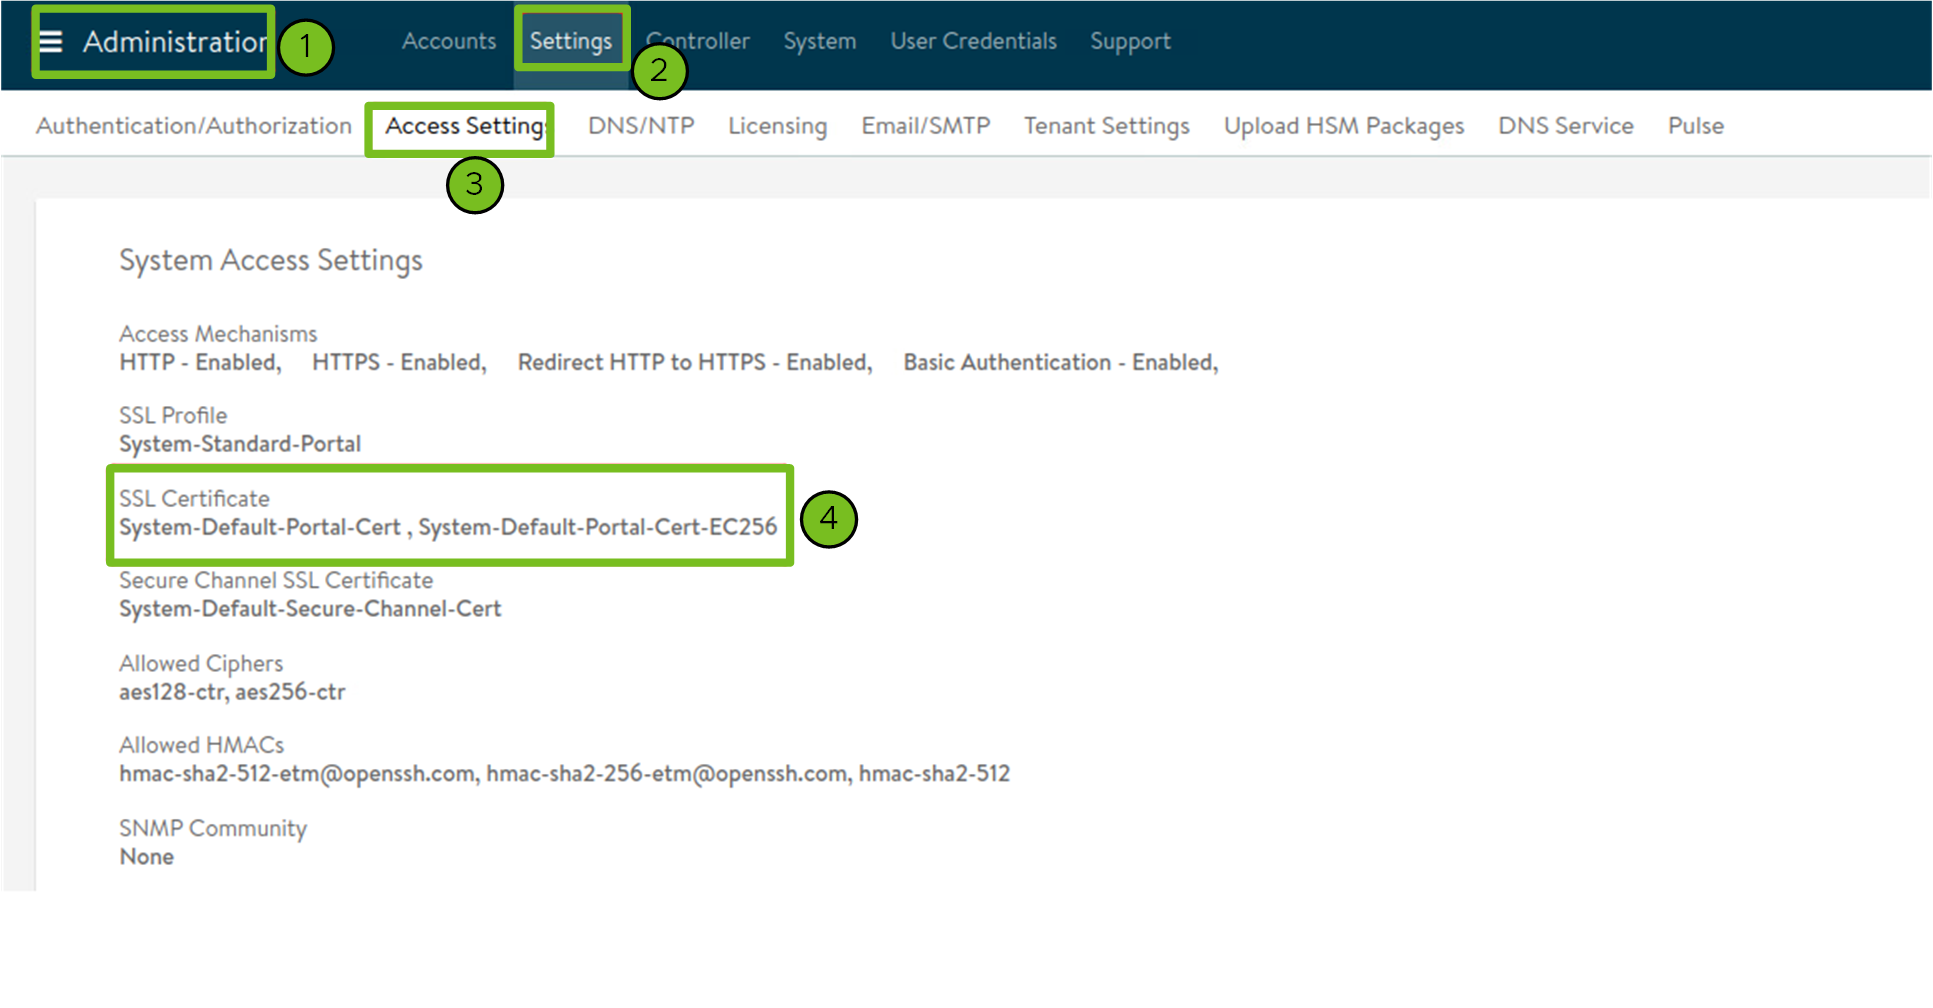
-----BEGIN CERTIFICATE-----.If you have a self-signed controller certificate, it must use an SSL/TLS certificate that is configured in the Avi Controller UI > Administration > Settings > Access Settings tab, under System Access Settings > SSL Certificate. You can retrieve the certificate contents as described in Avi Controller Setup: Custom Certificate.
-
Use the Cloud Name drop-down menu to select the cloud that you created in your NSX Advanced Load Balancer deployment.
For example,
Default-Cloud. -
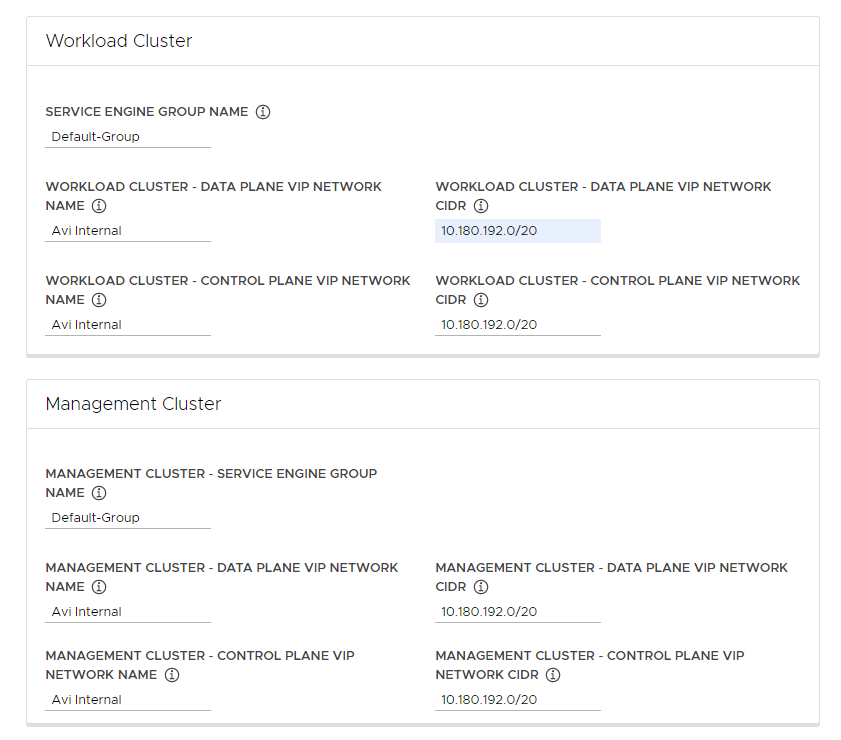
In the Workload Cluster and Management Cluster section, use the Service Engine Group Name drop-down menu to select a Service Engine Group.
For example,
Default-Group. -
In the Workload Cluster - Data Plane VIP Network Name drop-down menu, select the name of the network where the load balancer floating IP Pool resides.
The same network is automatically selected for use by the data and control planes of both workload clusters and management clusters. You can change these if necessary.
The VIP network for NSX ALB must be present in the same vCenter Server instance as the Kubernetes network that Tanzu Kubernetes Grid uses. This allows NSX Advanced Load Balancer to discover the Kubernetes network in vCenter Server and to deploy and configure Service Engines.
You can see the network in the Infrastructure > Networks view of the NSX Advanced Load Balancer interface.
-
In the Workload Cluster - Data Plane VIP Network CIDR and Workload Cluster - Control Plane VIP Network CIDR drop-down menus, select or enter the CIDR of the subnet to use for the load balancer VIP, for use by the data and control planes of workload clusters and management clusters.
This comes from one of the VIP Network’s configured subnets. You can see the subnet CIDR for a particular network in the Infrastructure > Networks view of the NSX Advanced Load Balancer interface. The same CIDRs are automatically applied in the corresponding management cluster settings. You can change these if necessary.
-
(Optional) Enter one or more cluster labels to identify clusters on which to selectively enable NSX ALB or to customize NSX ALB settings for different groups of clusters.
By default, NSX Advanced Load Balancer is enabled on all workload clusters deployed with this management cluster, and the clusters share the same VMware NSX Advanced Load Balancer Controller, Cloud, Service Engine Group, and VIP Network. This cannot be changed later.
Optionally, you can enable NSX ALB on only a subset of clusters or preserve the ability to customize NSX ALB settings for different groups of clusters later. This is useful in the following scenarios:
- You want to configure different sets of workload clusters to different Service Engine Groups to implement isolation or to support more Service type Load Balancers than one Service Engine Group’s capacity.
- You want to configure different sets of workload clusters to different Clouds because they are deployed in separate sites.
To enable NSX ALB selectively rather than globally, add labels in the format
key: value. Labels that you define here will be used to create a label selector. Only workload clusterClusterobjects that have the matching labels will have the load balancer enabled. As a consequence, you are responsible for making sure that the workload cluster’sClusterobject has the corresponding labels.For example, if you use
team: tkg, to enable the load balancer on a workload cluster:-
Set
kubectlto the management cluster’s context.kubectl config use-context management-cluster@admin -
Label the
Clusterobject of the corresponding workload cluster with the labels defined. If you define multiple key-values, you need to apply all of them.kubectl label cluster <cluster-name> team=tkg

-
Click Next to configure metadata.
- AWS
- Tanzu Kubernetes Grid on AWS automatically creates a load balancer when you deploy a management cluster.
- Azure
- Tanzu Kubernetes Grid on Azure automatically creates a load balancer when you deploy a management cluster.
Configure Metadata
This section is the same for all target platforms.
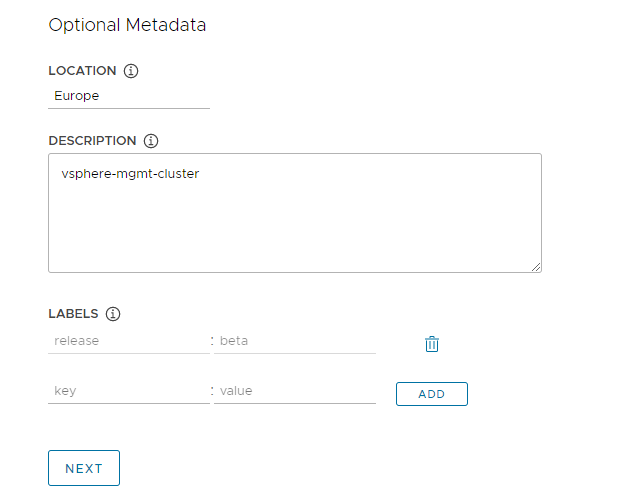
In the optional Metadata section, optionally provide descriptive information about this management cluster.
Any metadata that you specify here applies to the management cluster and to the workload clusters that it manages, and can be accessed by using the cluster management tool of your choice.
- Location: The geographical location in which the clusters run.
- Description: A description of this management cluster. The description has a maximum length of 63 characters and must start and end with a letter. It can contain only lower case letters, numbers, and hyphens, with no spaces.
- Labels: Key/value pairs to help users identify clusters, for example
release : beta,environment : staging, orenvironment : production. For more information, see Labels and Selectors in the Kubernetes documentation.
You can click Add to apply multiple labels to the clusters.
If you are deploying to vSphere, click Next to go to Configure Resources. If you are deploying to AWS or Azure, click Next to go to Configure the Kubernetes Network and Proxies.
Configure vSphere Resources
This section only applies to vSphere deployments.
- vSphere
-
In the
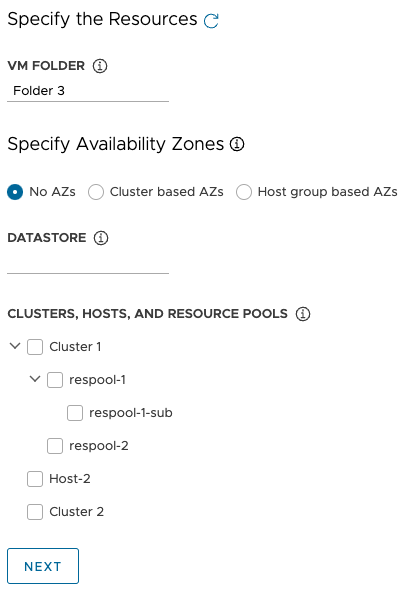
Resources section, select vSphere resources for the management cluster to use.
- Select the VM folder in which to place the management cluster VMs.
-
Select the vSphere datastores for the management cluster to use. The storage policy for the VMs can be specified only when you deploy the management cluster from a configuration file.
-
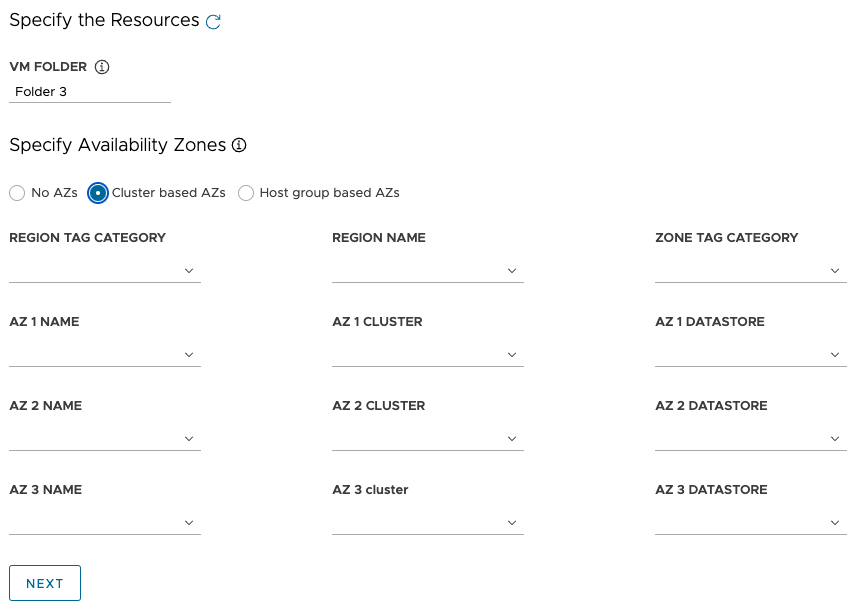
Under Specify Availability Zones, choose where to place the management cluster nodes, and then fill in the specifics:
-
No AZs: To place nodes by cluster, host, or resource pool, select the cluster, host, or resource pool in which to place the nodes.
-
Cluster based AZs: To spread nodes across multiple compute clusters in a datacenter, specify their AZs in one of the following ways:
- Select a region or zone, by its name or category, that contains the AZs.
- Select up to three specific AZs by name, cluster, or category.
-
Host group based AZs: To spread nodes across multiple hosts in a single compute cluster, specify their AZs in one of the following ways:
- Select a region or zone, by its name or category, that contains the AZs.
- Select up to three specific AZs by name, host group, or VM group.

Note
If appropriate resources do not already exist in vSphere, without quitting the Tanzu Kubernetes Grid installer, go to vSphere to create them. Then click the refresh button so that the new resources can be selected.
-
- Click Next to configure the Kubernetes network and proxies.
- AWS
- This section is not applicable to AWS deployments.
- Azure
- This section is not applicable to Azure deployments.
Configure the Kubernetes Network and Proxies
This section is the same for all target platforms, although some of the information that you provide depends on the provider that you are using.
-
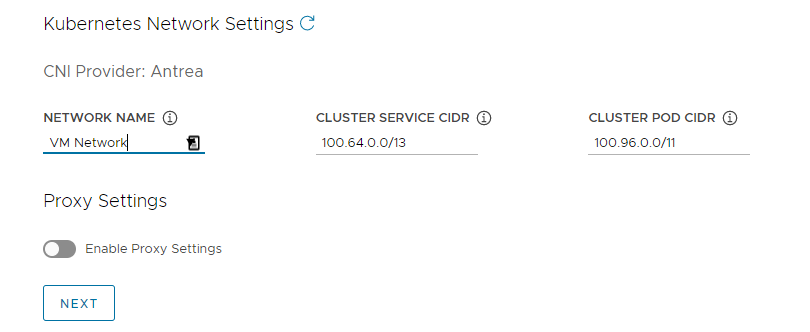
In the Kubernetes Network section, configure the networking for Kubernetes services and click Next.
- (vSphere only) Under Network Name, select a vSphere network to use as the Kubernetes service network.
- Review the Cluster Service CIDR and Cluster Pod CIDR ranges. If the recommended CIDR ranges of
100.64.0.0/13and100.96.0.0/11are unavailable, update the values under Cluster Service CIDR and Cluster Pod CIDR.
-
(Optional) To send outgoing HTTP(S) traffic from the management cluster to a proxy, for example in an internet-restricted environment, toggle Enable Proxy Settings and follow the instructions below to enter your proxy information. Tanzu Kubernetes Grid applies these settings to kubelet, containerd, and the control plane.
You can choose to use one proxy for HTTP traffic and another proxy for HTTPS traffic or to use the same proxy for both HTTP and HTTPS traffic.
Important
You cannot change the proxy after you deploy the cluster.
-
To add your HTTP proxy information:
- Under HTTP Proxy URL, enter the URL of the proxy that handles HTTP requests. The URL must start with
http://. For example,http://myproxy.com:1234. -
If the proxy requires authentication, under HTTP Proxy Username and HTTP Proxy Password, enter the username and password to use to connect to your HTTP proxy.
Note
Non-alphanumeric characters cannot be used in passwords when deploying management clusters with the installer interface.
- Under HTTP Proxy URL, enter the URL of the proxy that handles HTTP requests. The URL must start with
-
To add your HTTPS proxy information:
- If you want to use the same URL for both HTTP and HTTPS traffic, select Use the same configuration for https proxy.
-
If you want to use a different URL for HTTPS traffic, do the following:
- Under HTTPS Proxy URL, enter the URL of the proxy that handles HTTPS requests. The URL must start with
http://. For example,http://myproxy.com:1234. -
If the proxy requires authentication, under HTTPS Proxy Username and HTTPS Proxy Password, enter the username and password to use to connect to your HTTPS proxy.
Note
Non-alphanumeric characters cannot be used in passwords when deploying management clusters with the installer interface.
- Under HTTPS Proxy URL, enter the URL of the proxy that handles HTTPS requests. The URL must start with
-
Under No proxy, enter a comma-separated list of network CIDRs or hostnames that must bypass the HTTP(S) proxy. If your management cluster runs on the same network as your infrastructure, behind the same proxy, set this to your infrastructure CIDRs or FQDNs so that the management cluster communicates with infrastructure directly.
For example,
noproxy.yourdomain.com,192.168.0.0/24.- vSphere
-
Your
No proxy list must include the following:
- The IP address or hostname for vCenter. Traffic to vCenter cannot be proxied.
- The CIDR of the vSphere network that you selected under Network Name. The vSphere network CIDR includes the IP address of your Control Plane Endpoint. If you entered an FQDN under Control Plane Endpoint, add both the FQDN and the vSphere network CIDR to No proxy. Internally, Tanzu Kubernetes Grid appends
localhost,127.0.0.1, the values of Cluster Pod CIDR and Cluster Service CIDR,.svc, and.svc.cluster.localto the list that you enter in this field.
- AWS
-
Internally, Tanzu Kubernetes Grid appends
localhost,127.0.0.1, your VPC CIDR, Cluster Pod CIDR, and Cluster Service CIDR,.svc,.svc.cluster.local, and169.254.0.0/16to the list that you enter in this field. - Azure
-
Internally, Tanzu Kubernetes Grid appends
localhost,127.0.0.1, your VNet CIDR, Cluster Pod CIDR, and Cluster Service CIDR,.svc,.svc.cluster.local,169.254.0.0/16, and168.63.129.16to the list that you enter in this field.
Important
If the management cluster VMs need to communicate with external services and infrastructure endpoints in your Tanzu Kubernetes Grid environment, ensure that those endpoints are reachable by the proxies that you configured above or add them to No proxy. Depending on your environment configuration, this may include, but is not limited to, your OIDC or LDAP server, Harbor, and in the case of vSphere, VMware NSX, and NSX Advanced Load Balancer.
-
Configure Identity Management
This section is the same for all target platforms. For information about how Tanzu Kubernetes Grid implements identity management, see About Identity and Access Management.
-
In the Identity Management section, optionally select Activate Identity Management Settings .

You can deactivate identity management for proof-of-concept deployments, but it is strongly recommended to implement identity management in production deployments. If you deactivate identity management, you can activate it again later. For instructions on how to reenable identity management, see Enable and Configure Identity Management in an Existing Deployment in Configure Identity Management.
-
If you enable identity management, select OIDC or LDAPS.
Select the OIDC or LDAPS tab below to see the configuration information.
- OIDC
-
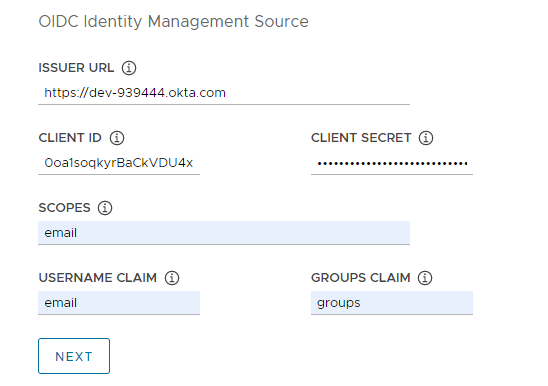
Provide details of your OIDC provider account, for example, Okta.
- Issuer URL: The IP or DNS address of your OIDC server.
- Client ID: The
client_idvalue that you obtain from your OIDC provider. For example, if your provider is Okta, log in to Okta, create a Web application, and select the Client Credentials options in order to get aclient_idandsecret. - Client Secret: The
secretvalue that you obtain from your OIDC provider. - Scopes: A comma separated list of additional scopes to request in the token response. For example,
openid,groups,email. - Username Claim: The name of your username claim. This is used to set a user’s username in the JSON Web Token (JWT) claim. Depending on your provider, enter claims such as
user_name,email, orcode. - Groups Claim: The name of your groups claim. This is used to set a user’s group in the JWT claim. For example,
groups.
- LDAPS
-
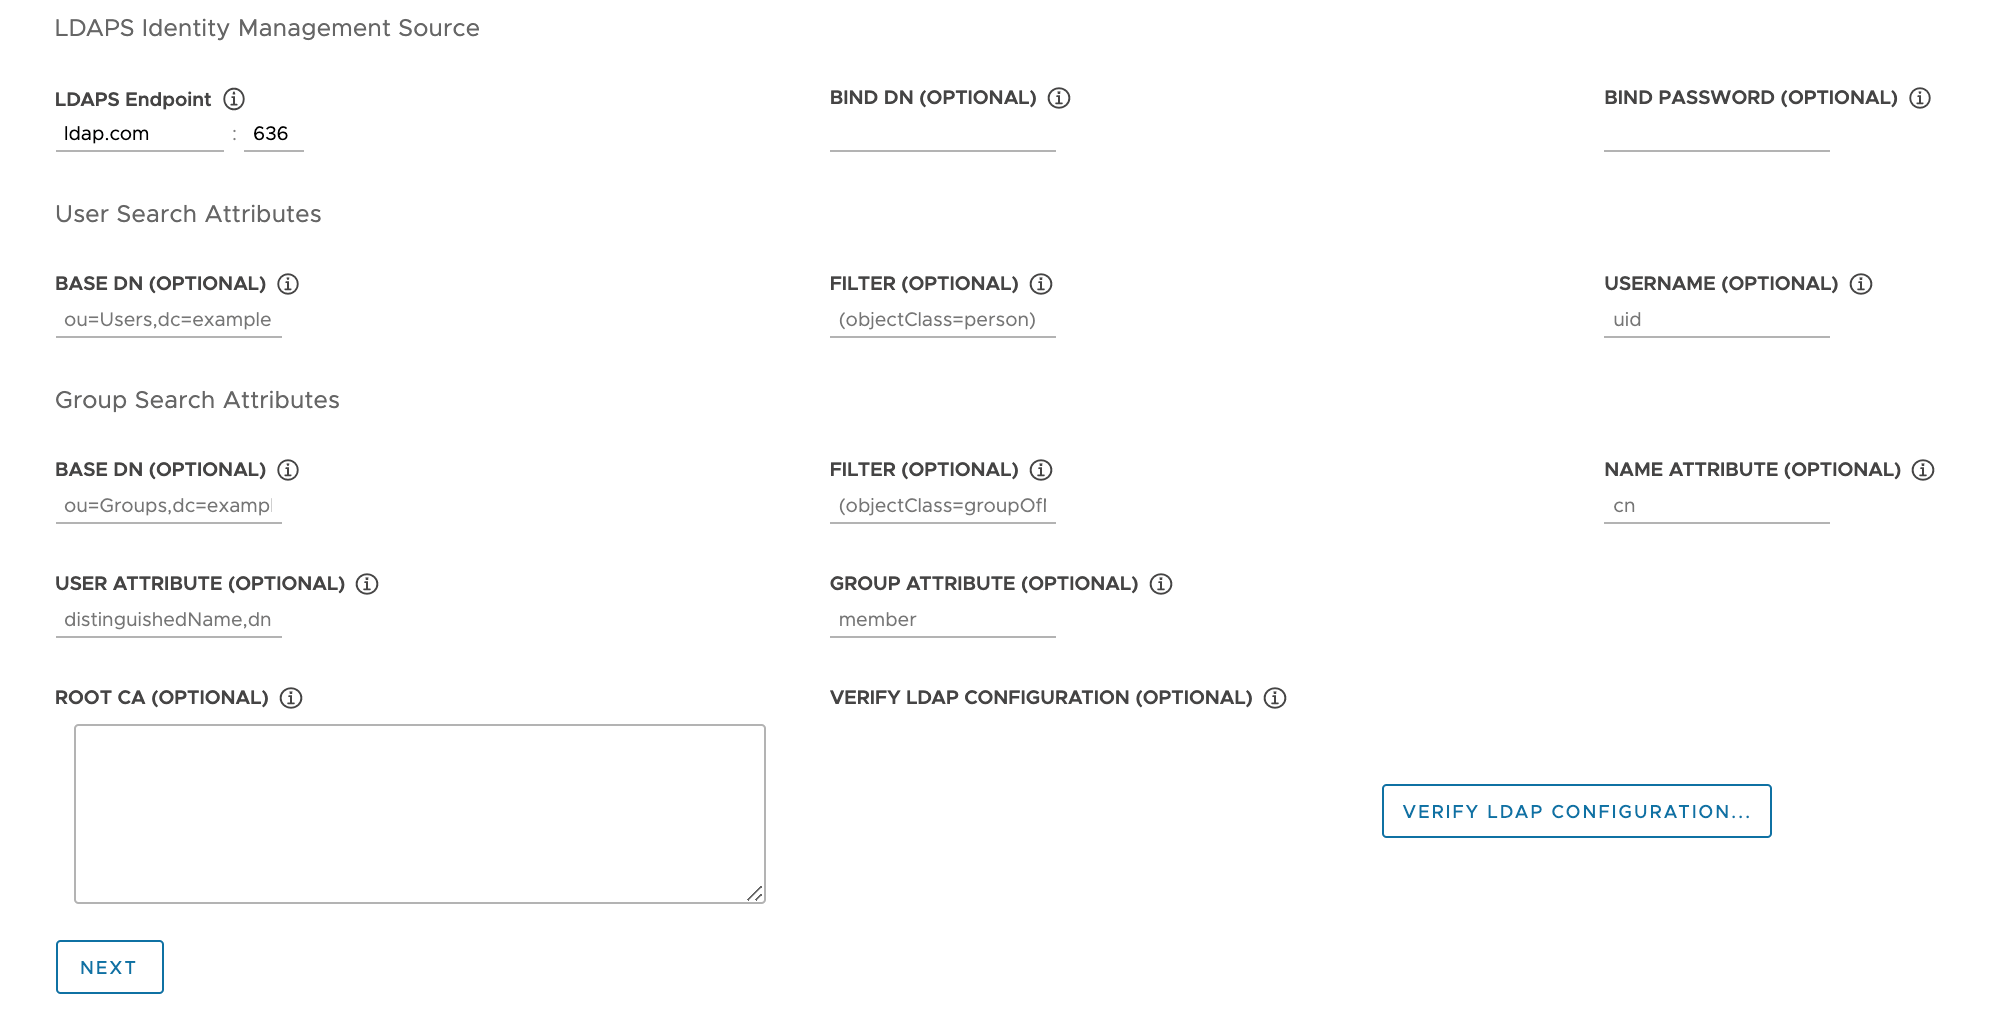
Provide details of your company’s LDAPS server. All settings except for
LDAPS Endpoint are optional.
- LDAPS Endpoint: The IP or DNS address of your LDAPS server. Provide the address and port of the LDAP server, in the form
host:port. - Bind DN: The DN for an application service account. The connector uses these credentials to search for users and groups. Not required if the LDAP server provides access for anonymous authentication.
- Bind Password: The password for an application service account, if Bind DN is set.
Provide the user search attributes.
- Base DN: The point from which to start the LDAP search. For example,
OU=Users,OU=domain,DC=io. - Filter: An optional filter to be used by the LDAP search.
- Username: The LDAP attribute that contains the user ID. For example,
uid, sAMAccountName.
Provide the group search attributes.
- Base DN: The point from which to start the LDAP search. For example,
OU=Groups,OU=domain,DC=io. - Filter: An optional filter to be used by the LDAP search.
- Name Attribute: The LDAP attribute that holds the name of the group. For example,
cn. - User Attribute: The attribute of the user record that is used as the value of the membership attribute of the group record. For example,
distinguishedName, dn. - Group Attribute: The attribute of the group record that holds the user/member information. For example,
member.
Paste the contents of the LDAPS server CA certificate into the Root CA text box.
(Optional) Verify the LDAP settings.
- Click the Verify LDAP Configuration option
-
Enter a user name and group name.
Note
In Tanzu Kubernetes Grid v1.4.x and greater, these fields are ignored and revert to
cnfor the user name andoufor the group name. For updates on this known issue, see the VMware Tanzu Kubernetes Grid 1.5 Release Notes. -
Click Start.
After completion of verification, if you see any failures, you must examine them closely in the subsequent steps.
Note
The LDAP host performs this check, and not the Management Cluster nodes. So your LDAP configuration might work even if this verification fails.
- LDAPS Endpoint: The IP or DNS address of your LDAPS server. Provide the address and port of the LDAP server, in the form
- Click Next to go to Select the Base OS Image.
Select the Base OS Image
In the OS Image section, use the drop-down menu to select the OS and Kubernetes version image template to use for deploying Tanzu Kubernetes Grid VMs, and click Next.
How Base OS Image Choices are Generated
The OS Image drop-down menu includes OS images that meet all of the following criteria:
- The image is available in your IaaS.
- On vSphere, you must import images as described in Import the Base Image Template into vSphere. You can import an image now, without quitting the installer interface. After you import it, use the Refresh button to make it appear in the drop-down menu.
- On Azure, you must accept the license as described in Accept the Base Image License in Prepare to Deploy Management Clusters to Microsoft Azure.
- The OS image is listed in the Bill of Materials (BoM) file of the Tanzu Kubernetes release (TKr) for the Kubernetes version that the management cluster runs on.
- Tanzu Kubernetes Grid v2.4 management clusters run on Kubernetes v1.27.5.
- To use a custom image, you modify the TKr’s BoM file to list the image, as explained in Build Machine Images.
- vSphere, AWS, and Azure images are listed in the BoM’s
ova,ami, andazureblocks, respectively.
- The image name in the IaaS matches its identifier in the TKr BoM:
- vSphere, AWS, and Azure images are identified by their
version,id, andskufield values, respectively.
- vSphere, AWS, and Azure images are identified by their
Finalize the Deployment
This section is the same for all target platforms.
-
In the CEIP Participation section, optionally deselect the check box to opt out of the VMware Customer Experience Improvement Program, and click Next.
You can also opt in or out of the program after the deployment of the management cluster. For information about the CEIP, see Manage Participation in CEIP and https://www.vmware.com/solutions/security/trustvmware/ceip-products.
-
Click Review Configuration to see the details of the management cluster that you have configured. If you want to return to the installer wizard to modify your configuration, click Edit Configuration.
When you click Review Configuration, the installer populates the cluster configuration file, which is located in the
~/.config/tanzu/tkg/clusterconfigssubdirectory, with the settings that you specified in the interface. You can optionally export a copy of this configuration file by clicking Export Configuration. -
Click Deploy Management Cluster.
Deployment of the management cluster can take several minutes. The first run of
tanzu mc createtakes longer than subsequent runs because it has to pull the required Docker images into the image store on your bootstrap machine. Subsequent runs do not require this step, so are faster. You can follow the progress of the deployment of the management cluster in the installer interface or in the terminal in which you rantanzu mc create --ui. If the machine on which you runtanzu mc createshuts down or restarts before the local operations finish, the deployment will fail. If you inadvertently close the browser or browser tab in which the deployment is running before it finishes, the deployment continues in the terminal.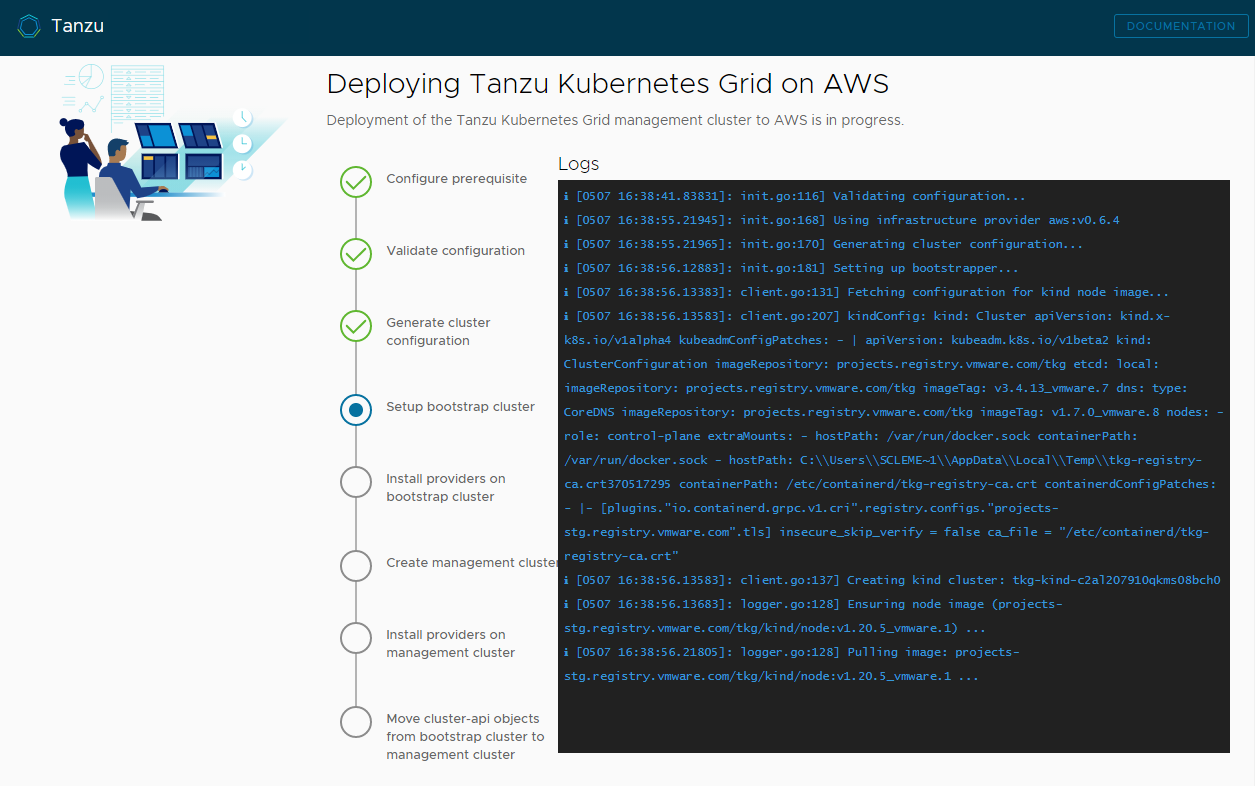
-
(Optional) Under CLI Command Equivalent, click the Copy button to copy the CLI command for the configuration that you specified. This CLI command includes the path to the configuration file populated by the installer.
-
(vSphere only) After you deploy a management cluster to vSphere you must configure the IP addresses of its control plane nodes to be static, as described in Configure DHCP Reservations for the Control Plane (vSphere Only).
What to Do Next
- Save the configuration file: The installer saves the configuration of the management cluster to
~/.config/tanzu/tkg/clusterconfigswith a generated filename of the formUNIQUE-ID.yaml. This configuration file has a flat structure that sets uppercase-underscore variables likeCLUSTER_NAME. After the deployment has completed, you can optionally rename the configuration file to something memorable, and save it in a different location for future use. The installer also generates a Kubernetes-style, class-based object spec for the management cluster’sClusterobject, that is saved in a file with the same name as the management cluster. This class-based object spec is provided for information only. Deploying management clusters from a class-based object spec is not yet supported. For more information about cluster types in TKG 2.x, see Workload Clusters in About Tanzu Kubernetes Grid. - Configure identity management: If you enabled OIDC or LDAP identity management for the management cluster, you must perform the post-deployment steps described in Complete the Configuration of Identity Management to enable access.
- Register your management cluster with Tanzu Mission Control: If you want to register your management cluster with Tanzu Mission Control, see Register Your Management Cluster with Tanzu Mission Control.
- Deploy workload clusters: Once your management cluster is created, you can deploy workload clusters as described in Creating Workload Clusters in Creating and Managing TKG 2.4 Workload Clusters with the Tanzu CLI.
- Deploy another management cluster: To deploy more than one management cluster, on any or all of vSphere, Azure, and AWS, see Managing Your Management Clusters. This topic also provides information about how to add existing management clusters to your CLI instance, obtain credentials, scale and delete management clusters, add namespaces, and how to opt in or out of the CEIP.
For information about what happened during the deployment of the management cluster and how to connect kubectl to the management cluster, see Examine and Register a Newly-Deployed Standalone Management Cluster.